Menu điều hướng
Lắp đặt pa lăng cáp điện là công việc quan trọng đòi hỏi sự chính xác, tuân thủ các giao thức an toàn, và sự hiểu biết rõ ràng về thiết bị và môi trường của nó. Lắp đặt không đúng cách có thể dẫn đến hư hỏng thiết bị, thiệt hại tài sản, hoặc chấn thương nghiêm trọng. Hướng dẫn này cung cấp cái nhìn tổng quan chung về các bước chính liên quan. Luôn ưu tiên và tuân thủ nghiêm ngặt hướng dẫn cài đặt cụ thể của nhà sản xuất cho đúng model của bạn.
Trò chuyện trực tuyếnĐọc hướng dẫn: Trước khi chạm vào bất cứ thứ gì, đọc kỹ và hiểu cách cài đặt của nhà sản xuất, hoạt động, và hướng dẫn bảo trì.
Nhân sự có trình độ: Việc lắp đặt chỉ nên được thực hiện bởi người đã được đào tạo, nhân viên có kinh nghiệm am hiểu về vận thăng, sự gian lận, và hệ thống điện.
PPE là bắt buộc: Mang thiết bị bảo hộ cá nhân thích hợp (PPE) mọi lúc: mũ cứng, kính an toàn, ủng mũi thép, và găng tay hạng nặng.
An ninh khu vực làm việc: Đảm bảo khu vực lắp đặt không có nhân viên trái phép. Sử dụng rào chắn hoặc biển cảnh báo.
Thiết bị nâng: Sử dụng cáp treo được đánh giá đúng, xiềng xích, và thiết bị nâng (như cần cẩu hoặc xe nâng) phù hợp với trọng lượng của vận thăng. Xác minh xếp hạng tải.
Khóa/gắn thẻ (TRÁI TIM): Trước khi thực hiện bất kỳ công việc điện nào, đảm bảo nguồn điện được cách ly và khóa/gắn thẻ theo quy trình của cơ sở.
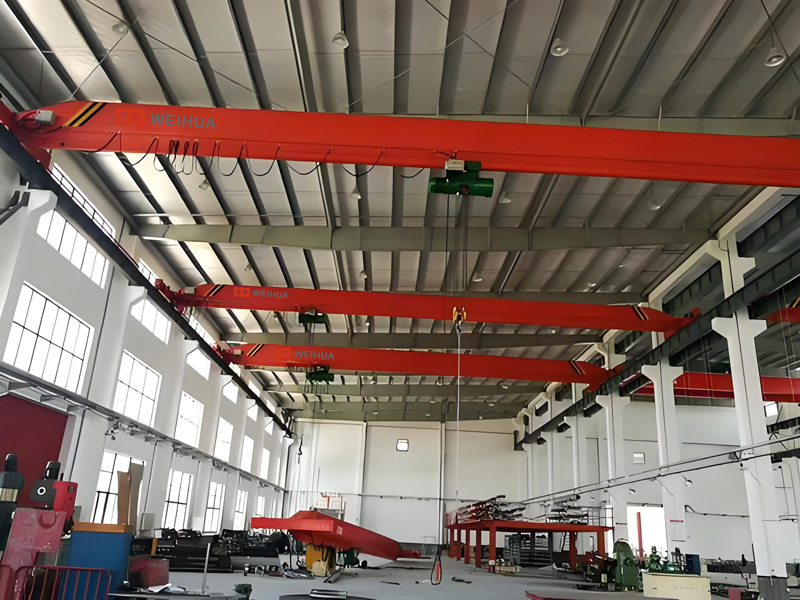
Tính toàn vẹn về cấu trúc: Xác minh cấu trúc hỗ trợ (chùm tia, đường ray đơn, vân vân.) đã được kiểm định và chứng nhận có thể chịu được tải trọng của tời cộng với tải trọng định mức tối đa, bao gồm cả động lực.
1. Bộ cài đặt của nhà sản xuất (bu lông, vòng đệm, miếng chêm, vân vân.)
Chuẩn bị trước khi cài đặt:
Kiểm tra hiện trường: Kiểm tra cẩn thận vị trí lắp đặt. Đảm bảo có đủ khoảng trống trên không, bên dưới, và trên tất cả các phía của đường di chuyển của tời. Kiểm tra các vật cản như đường ống, ống dẫn, hoặc cấu trúc.
Xác minh hỗ trợ kết cấu: Kiểm tra kỹ chứng nhận khả năng chịu tải của dầm đường băng hoặc kết cấu đỡ. Đảm bảo nó vượt quá tổng tải (trọng lượng tời + công suất định mức + trợ cấp cho tác động).
Giải nén & Thanh tra: Cẩn thận tháo vận thăng và tất cả các bộ phận. Kiểm tra trực quan mọi thứ xem có bị hư hỏng khi vận chuyển không. So sánh các bộ phận nhận được với danh sách đóng gói và hướng dẫn sử dụng. Báo cáo ngay lập tức bất kỳ sự khác biệt hoặc thiệt hại nào.
Chuẩn bị bề mặt lắp đặt: Làm sạch mặt bích trên của dầm đỡ nơi đặt tời. Loại bỏ rỉ sét, bụi bẩn, sơn, hoặc vết hàn có thể cản trở sự tiếp xúc thích hợp.
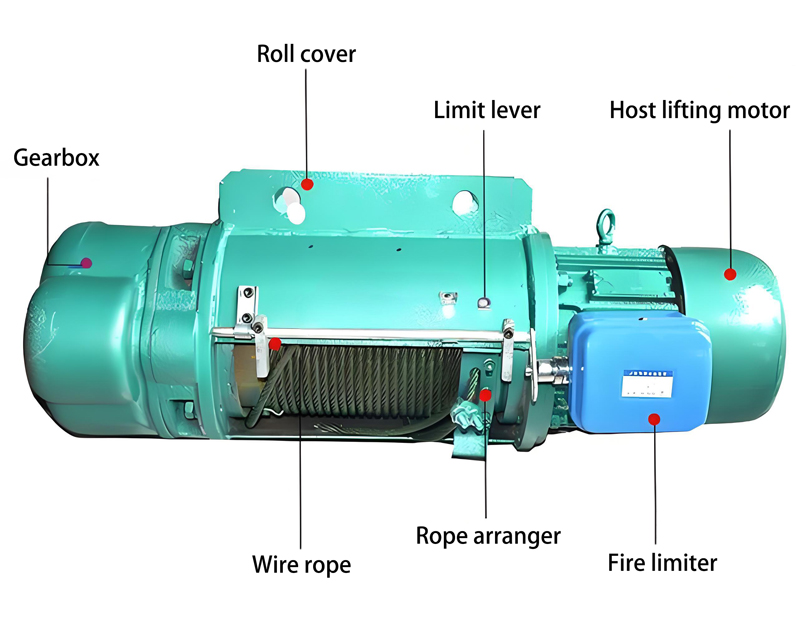
Lắp Palăng:
Định vị: Sử dụng các điểm nâng được chỉ định trên thân tời (tham khảo hướng dẫn sử dụng!), cẩn thận nâng vận thăng bằng cách sử dụng giàn thích hợp. Từ từ điều khiển nó vào vị trí trên dầm đỡ.
Căn chỉnh: Căn chỉnh chân hoặc đế của tời vuông góc với mặt bích dầm. Đảm bảo hướng di chuyển của tời chính xác so với đường băng.
Vị trí ban đầu: Nhẹ nhàng hạ tời xuống mặt bích dầm. Chưa siết chặt hoàn toàn các bu lông.
Lên cấp: Sử dụng các mức chính xác được đặt trên các bề mặt gia công quan trọng của vận thăng (VÍ DỤ., vỏ hộp số, bề mặt lắp động cơ – tham khảo hướng dẫn sử dụng). Miếng đệm giữa chân tời và mặt bích dầm khi cần thiết để đạt được độ bằng phẳng theo cả chiều dọc (hướng di chuyển) và ngang (ngang qua chùm tia) máy bay. Mức độ là rất quan trọng để chia lưới bánh răng thích hợp, cuộc sống mang, và chức năng phanh.
Chốt cuối cùng: Một khi đã đạt đến cấp độ hoàn hảo, chèn các bu lông lắp, vòng đệm, và các loại hạt do nhà sản xuất cung cấp. Siết chặt dần dần và đều các bu lông theo trình tự chéo với mô-men xoắn chính xác được chỉ định trong hướng dẫn sử dụng bằng cách sử dụng cờ lê mô-men xoắn đã hiệu chỉnh. Siết quá chặt có thể làm biến dạng khung vận thăng; thắt chặt rủi ro nới lỏng. Kiểm tra lại mức độ sau khi siết chặt lần đầu.
Kết nối điện (Chỉ thợ điện có trình độ!):
TRÁI TIM: Xác nhận nguồn điện đã bị KHÓA và GẮN THẺ RA tại nguồn.
Ống dẫn/Mương: Chạy ống dẫn hoặc mương thích hợp từ nguồn điện đến hộp nối của tời hoặc điểm kết nối được chỉ định. Tuân theo mã điện.
Kéo cáp: Kéo cáp cấp nguồn có kích thước chính xác (điện áp, giai đoạn, độ khuếch đại theo hướng dẫn sử dụng và mã địa phương) qua ống dẫn đến Hoạt vận động điện hộp kết nối.
Chấm dứt: dải, uốn (nếu được yêu cầu), và chấm dứt các dây dẫn pha (L1, L2, L3), đất (Thể dục), và trung tính (N, nếu được yêu cầu) chắc chắn vào các thiết bị đầu cuối được chỉ định bên trong hộp kết nối tời. Thực hiện theo sơ đồ nối dây trong sách hướng dẫn một cách tỉ mỉ. Đảm bảo các kết nối chặt chẽ và không có sợi dây lạc. Kiểm tra kỹ trình tự pha nếu cần (hướng dẫn sử dụng sẽ chỉ định).
Nối đất: Các tời kéo dây điện khung PHẢI được nối đất đúng cách bằng cách sử dụng đầu nối đất được chỉ định và dây dẫn nối đất có kích thước phù hợp. Điều này rất quan trọng cho sự an toàn.
Kiểm soát hệ thống dây điện: Nếu lắp đặt các trạm treo, điều khiển vô tuyến, hoặc tích hợp vào hệ thống điều khiển cần cẩu, làm theo hướng dẫn nối dây cụ thể của nhà sản xuất cho các mạch này. Đảm bảo giảm sức căng thích hợp cho cáp treo.
Niêm phong: Đảm bảo tất cả các lối vào ống dẫn vào hộp kết nối vận thăng được bịt kín đúng cách để tránh bụi và hơi ẩm xâm nhập.
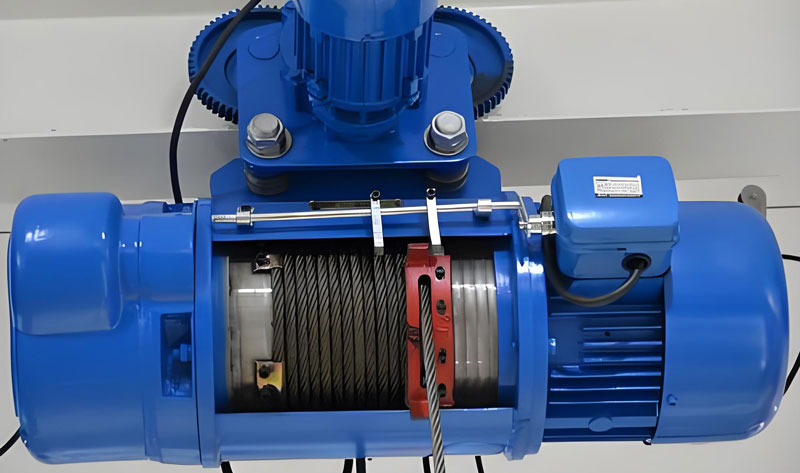
Lắp đặt dây cáp & Spooling (Nếu không được reed trước):
Xử lý cẩn thận: Dây cáp dễ bị hư hỏng do bị xoắn hoặc bị nghiền nát. Đeo găng tay nặng. Tháo cuộn cẩn thận bằng phương pháp bàn xoay hoặc lăn, không bao giờ bằng cách kéo hoặc tháo cuộn ra khỏi đầu.
Luồng: Thực hiện theo sơ đồ chính xác trong sách hướng dẫn để luồn dây qua ròng rọc phía trên(S)/ròng rọc khối móc, vào trống, và đảm bảo ngõ cụt. Hãy chú ý đến hướng cuộn dây (trên hoặc dưới) và số lượng “vòng chết” cần thiết còn lại trên trống ở vị trí móc thấp nhất.
Bảo mật ngõ cụt: Cố định đầu dây đúng theo hướng dẫn (cái kẹp, ổ cắm nêm, vân vân.). Mô-men xoắn bất kỳ ốc vít nào theo đặc điểm kỹ thuật. Áp dụng lớp đầu tiên một cách cẩn thận.
Spooling ban đầu: Với khối móc được hạ xuống gần mặt đất, cấp nguồn cho tời theo hướng “LÊN” rất chậm. Dẫn dây trực quan vào trống, đảm bảo nó cuộn chặt và đều, từng lớp một, không có khoảng trống hoặc vượt qua. Cuộn dây không đều có thể gây hư hỏng và mất ổn định dây nghiêm trọng. Bôi trơn nếu được chỉ định.
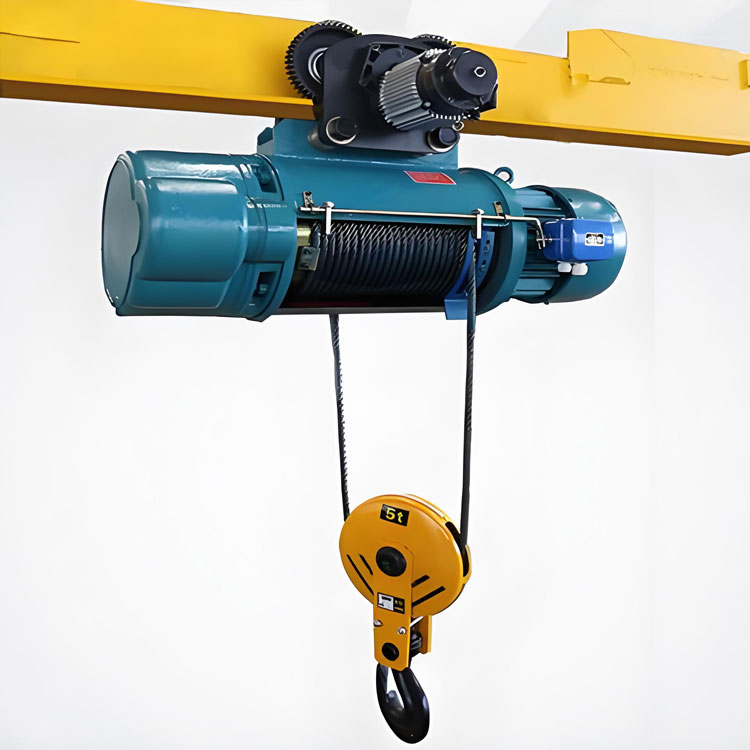
Hội khối móc (Nếu không được lắp ráp trước):
Kiểm tra trước khi vận hành & Kiểm tra:
Kiểm tra trực quan: Đi vòng quanh lần cuối. Kiểm tra độ kín của tất cả các bu lông, xác minh không còn dụng cụ hoặc mảnh vụn nào trên tời, đảm bảo có lực lượng bảo vệ tại chỗ, và xác nhận lộ trình du lịch rõ ràng.
Giới hạn công tắc: Ngắt thủ công các công tắc giới hạn trên và dưới (nếu được trang bị) để đảm bảo chúng hoạt động tốt trước khi bật nguồn. Xác minh rằng họ dừng vận thăng như dự định.
Kiểm tra phanh (Không tải): Với cái móc trống rỗng, nâng nó lên khỏi mặt đất vài inch. Dừng vận thăng. Quan sát xem có bất kỳ hiện tượng leo dốc nào không, cho biết các vấn đề điều chỉnh phanh tiềm ẩn. Lặp lại.
Kiểm soát hướng: Kiểm tra cả hai hướng LÊN và XUỐNG bằng mặt dây chuyền/bộ điều khiển. Đảm bảo chuyển động mượt mà và tương ứng chính xác với đầu vào điều khiển.
chuyển động du lịch: Nếu một phần của xe đẩy hoặc cần cẩu, kiểm tra chuyển động ngang theo cả hai hướng. Kiểm tra hoạt động trơn tru và dừng thích hợp.
Kiểm tra tải (Chủ yếu!): Sau khi thử nghiệm không tải thành công, tiến hành thử tải:
25-50% Kiểm tra tải: Nâng một trọng lượng đã biết trong phạm vi này. Kiểm tra hoạt động của tời nâng, phanh (dừng lại và giữ), giới hạn công tắc, và sự ổn định của cấu trúc.
100% Kiểm tra tải định mức: Nâng toàn bộ công suất định mức. Thực hiện nhiều lần nâng, dừng lại, và giữ. Kiểm tra kỹ càng xe nâng, gắn, kết cấu, cuộn dây cáp, và hiệu suất phanh.
125% Kiểm tra tải định mức (Thường quy định): Thang máy 125% công suất định mức. Đây là bài kiểm tra an toàn quan trọng thường được yêu cầu bởi các quy định và bảo hiểm. Palăng dây cáp điện phải nâng, giữ (không leo), và hạ tải an toàn. Giám sát chặt chẽ cấu trúc và lắp đặt trong quá trình thử nghiệm này. Tuân thủ nghiêm ngặt mọi quy trình an toàn.
Chức năng: Kiểm tra tất cả các biện pháp kiểm soát, giới hạn công tắc, nút dừng khẩn cấp (nếu được trang bị), và tính năng an toàn.
Quyết toán & Tài liệu:
Bôi trơn: Bôi chất bôi trơn vào các điểm được chỉ định (hộp số, Vòng bi, bánh răng mở, dây cáp – nếu được khuyên dùng cho loại dây cụ thể của bạn) theo lịch trình của hướng dẫn.
Dọn dẹp: Xóa tất cả các công cụ, bao bì, và mảnh vụn từ khu vực làm việc.
Tài liệu: Hoàn thành tất cả các báo cáo kiểm tra và thử nghiệm cần thiết. Ghi lại dãy số, kết quả kiểm tra tải, và chi tiết cài đặt. Lưu trữ hướng dẫn sử dụng và tài liệu của nhà sản xuất một cách an toàn.
Đào tạo người vận hành: Đảm bảo chỉ những nhân viên được đào tạo và có thẩm quyền mới vận hành vận thăng. Cung cấp cho họ các hướng dẫn vận hành và quy trình an toàn.
An toàn là trên hết: Không bao giờ thỏa hiệp về các thủ tục an toàn, PPE, hoặc LOTO.
Hướng dẫn sử dụng là Luật: Hướng dẫn của nhà sản xuất ghi đè lên mọi hướng dẫn chung.
Tính toàn vẹn về cấu trúc: Cấu trúc hỗ trợ phải được chứng nhận cho tổng tải trọng.
Lên cấp là rất quan trọng: Palăng không cân bằng sẽ hỏng sớm.
mô-men xoắn chính xác: Sử dụng cờ lê lực trên tất cả các ốc vít quan trọng.
Đấu dây đúng cách: Chỉ những thợ điện có trình độ mới được thực hiện công việc điện.
Spooling đồng đều: Cần thiết cho tuổi thọ của dây cáp và vận thăng.
Kiểm tra kỹ lưỡng: Không tải, trọng tải (25%, 100%, 125%), và kiểm tra chức năng là bắt buộc.
Tài liệu mọi thứ: Lưu giữ hồ sơ chi tiết về quá trình lắp đặt, điều tra, và thử nghiệm.

Bằng cách tuân thủ tỉ mỉ các bước này và hướng dẫn cụ thể của nhà sản xuất, bạn có thể đảm bảo an toàn, đáng tin cậy, và lắp đặt lâu dài cho tời cáp điện của bạn. Nhớ, đây là một thiết bị công nghiệp phức tạp – hãy tôn trọng sức mạnh của nó và ưu tiên sự an toàn ở mọi giai đoạn.
Chúng tôi coi trọng phản hồi của bạn! Vui lòng hoàn thành biểu mẫu bên dưới để chúng tôi có thể điều chỉnh các dịch vụ của mình theo nhu cầu cụ thể của bạn.

20 Tấn các tính năng chính của vận thăng điện & Những lợi ích 1. Khả năng nâng đặc biệt &……
Palăng điện treo tường Weihua được thiết kế dành cho người dùng công nghiệp cần……
Các 3 Palăng xích điện tấn là thiết bị nâng cỡ trung được phát triển bởi Weihua G……
Các 500 Palăng điện lb là tời điện nhỏ được phát triển bởi Tập đoàn Weihua, một người hiểu biết……

